Select a Catagory:
Breaking News
This area does not yet contain any content.

Entries by Kossover, Zeke (58)

Thursday
May032012

Pressure Cooker Squished Cups

If you put expanded polystyrene (Styrofoam) cups in a pressure cooker and turn up the heat, they will shrink down to approximately 1/6 their original volume.

Procedure

As I'll explain later, you don't actually need a pressure cooker, though they work the best. I use an electric pressure cooker for the show since it is easier to use. I don't need a hot plate, and the countdown timer shuts itself off, but a stove top one works too.

Even gentle heating is important if you want the cups to keep their shape while shrinking. So, you want the cups out of the water,  and on a flat surface that can take the heat but not conduct it too well to the cups. I use a Pyrex lid to a oven casserole. I lift it out of the water with three crumpled balls of aluminum foil.


Use permanent marker to write on the cups and place them in the pressure cooker. My cooker takes about 20 minutes at pressure to shrink the cups. You can crowd them in the container. They'll stick a little after you're done, but they easily pull apart.

How Does This Work?

A digression for a moment. When submersibles go down into the depths of the ocean, they often bring Styrofoam with them on the outside of the craft. It gets crushed, like in this picture from some cups taken down in the Alvin.

Does the pressure cooker do the same thing? The pressure cooker "only" has twice the pressure as usual. While that is enough to make a dangerous mess if the cooker were to rupture, that's not high compared to what the Alvin does. Two atmospheres is like going down to a depth of 10 meters. The cups get fully crushed on the Alvin at 300 m. Hmmm....

Perhaps it is the heat? Heat makes the Styrofoam soft and bendy. I'm imagining that the heat (and pressure) pops the foam, and the foam collapses back into its unexpanded state.


Thursday
May032012

Siphon Model

A siphon is usually presented a tube that has one end higher than the other and is completely filled with liquid. A Google image search gives dozens of pictures along that line. 

The explanation that often goes with these pictures has to do with atmospheric pressure. That air pressure is slightly higher on the high side (A) and slightly lower on the down side (B). That's true but not the whole story. The difference in air pressure helps to hold the water together and does push it, but a siphon will work without air pressure. 

A better way to think of a siphon is probably good ol' conservation of energy. Though it takes energy to lift the water over the lip (from A to C) of the first side, the energy can be gained can be returned if the water on the other side ends up lower than where it started in the first side. 

The hard part is actually getting the energy back to the first side to lift the next bit of water. Atmospheric pressure helps to hold the water together so it doesn't break into two pieces at the bend. 

If the material can hold together on its own, then the siphon could work in a vacuum. The beaded chain in my video demonstrates this idea. If you pull it over the top and let it hang to the table it. 

Tuesday
May012012

Improved Elihu Thomson Coil (Jumping Ring)

My previous Elihu Thomson (I'm pretty sure that it isn't "Thompson") Coil -- worked okay, but my new one works like a dream, though it is a bit expensive to make, mostly because copper costs so much these days.

Parts:

  • 500 ft spool of stranded (if you can find it) 12 or 14 gauge copper single conductor wire like this
  • sacrificial extension cord
  • heat shrink
  • 1 1/2 inch schedule 40 or 80 PVC pipe (about 14 inches long)
  • drop ceiling wire or iron welding rods (you are looking for thin iron or mild steel wires at least as long as you PVC pipe) I needed about 100 feet
  • lever action mini bolt cutters like one of these
  • polyurethane spray
  • aluminum and copper rings (see below)

Step 1: Find the right spool of copper wire


When the manufacturer coils a spool of wire, sometimes they tuck one end of the wire through a gap in the spool towards the center. This is called the tail, and you want to buy a spool that has this. I've outlined it in red. Most do, but you'll need to check. Sometimes it is tucked into the center of the spool; that will work but it's less convenient. 

Step 2: Expanding the hole.

The spool will have a small hole for hanging on a bar, but you want a bigger hole. Use a hacksaw blade with tape around one end as a handle. Cut the hole so that it matches the outside diameter of your piece of PVC. 
 

Step 3:

Cut the outlet end of the extension cord off. Strip some insulation off the cord. Do the same to the wire on the spool.

Slip heatshrink onto the extension cord and slide down. Attach one wire from the spool to one wire from the extension cord. This needs to be a strong attachment. I used the NASA standard for splicing since it strongly resists coming apart. Solder the one end of the coil to one wire of the extension cord. Do the same to the other wire. Pull the heatshrink down and use a heatgun to shrink. You may notice that I used several layers of heatshrink to get the insulation to the same thickness on both ends.

This is kind of important. You are going to plug this into the wall with 120 V available. You don't want to touch 120 V.

Note: Some people will want to connect a momentary or push button switch instead of just plugging the coil into the wall or using a power strip. I understand. It is possible that the launcher will overheat and there is live wall current. I didn't do that, but you might have a different standard of safety.

Step 4: Cutting the wires.

Cut the steel wires to the length of the tube. Standard wire cutters won't work. You'll need the mini bolt cutters. Even with a jig, I find it hard to cut them all to the same length.

Spray them with polyurethane to make them insulating. We want to minimize eddy currents in the wires. 

Push them as tightly as you can into the PVC tube. I needed a mallet. The wires aren't held in with glue. Friction seems to be enough.

Step 5: Buy some rings 

Online Metals seems to be a good place to order aluminum or copper tubing. If you go with 1.5 inch PVC then 2.25 inch outside diameter aluminum tubing works well. I found that the 0.125 wall thickness tubing fired the highest, but I also got some thicker 0.25 inch tubing. They will cut to length, and I got 2 inch, 1 inch, and 0.5 inch long pieces. I also bought equivalently sized copper to show that though it is a better conductor, it doesn't fly as high. The copper is expensive, though.

The rings will come with sharp edges. A knife blade will clean them up but a deburring tool works better.

Enjoy!

Wednesday
Apr252012

Improved Ping Pong Ball Vacuum Cannon

I've been planning on improving my Ping Pong Ball Vacuum Cannon for several years, but never really gotten around to it. A couple of months ago, I started on the redesign. Most of the changes were small, but overall they worked out well in a slightly shorter device.

Concept

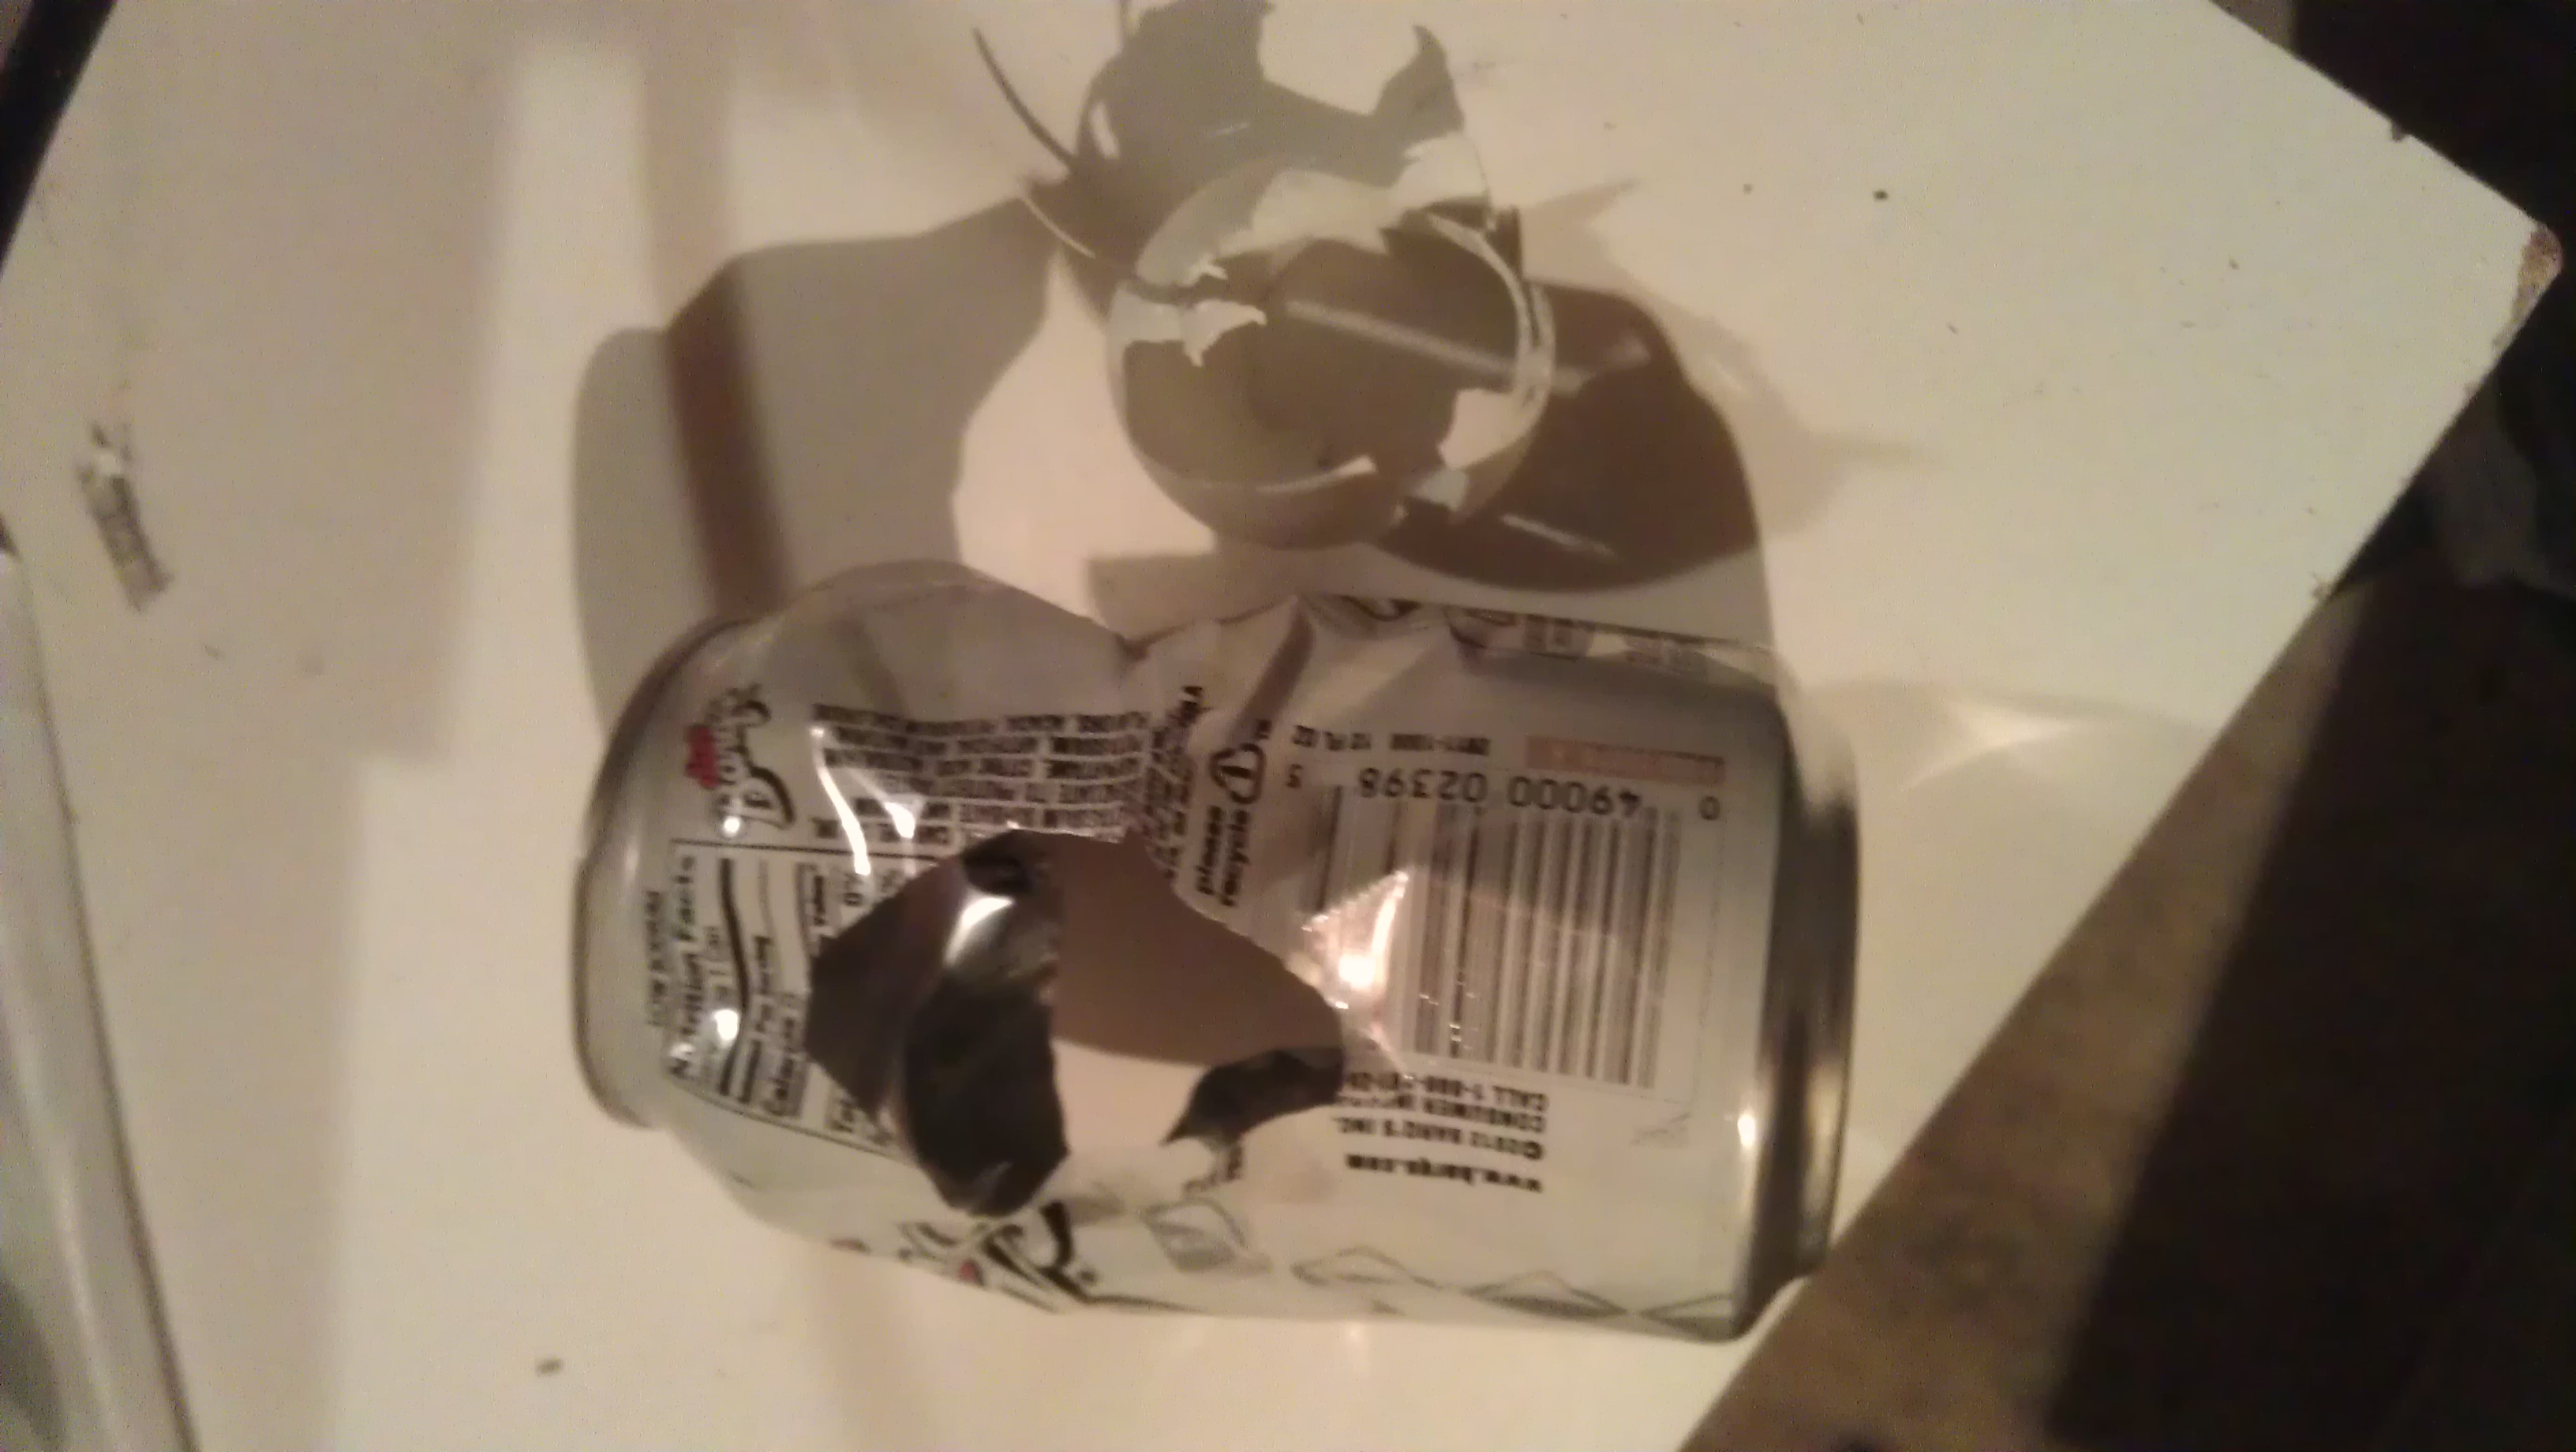
A Ping Pong Ball is placed at the end of aPVC pipe. The ends are covered with mylar. A soda can is placed near the other end. The pipe is evacuated. The far end is ruptured. The Ping Pong ball exits and rips a hole in the can.
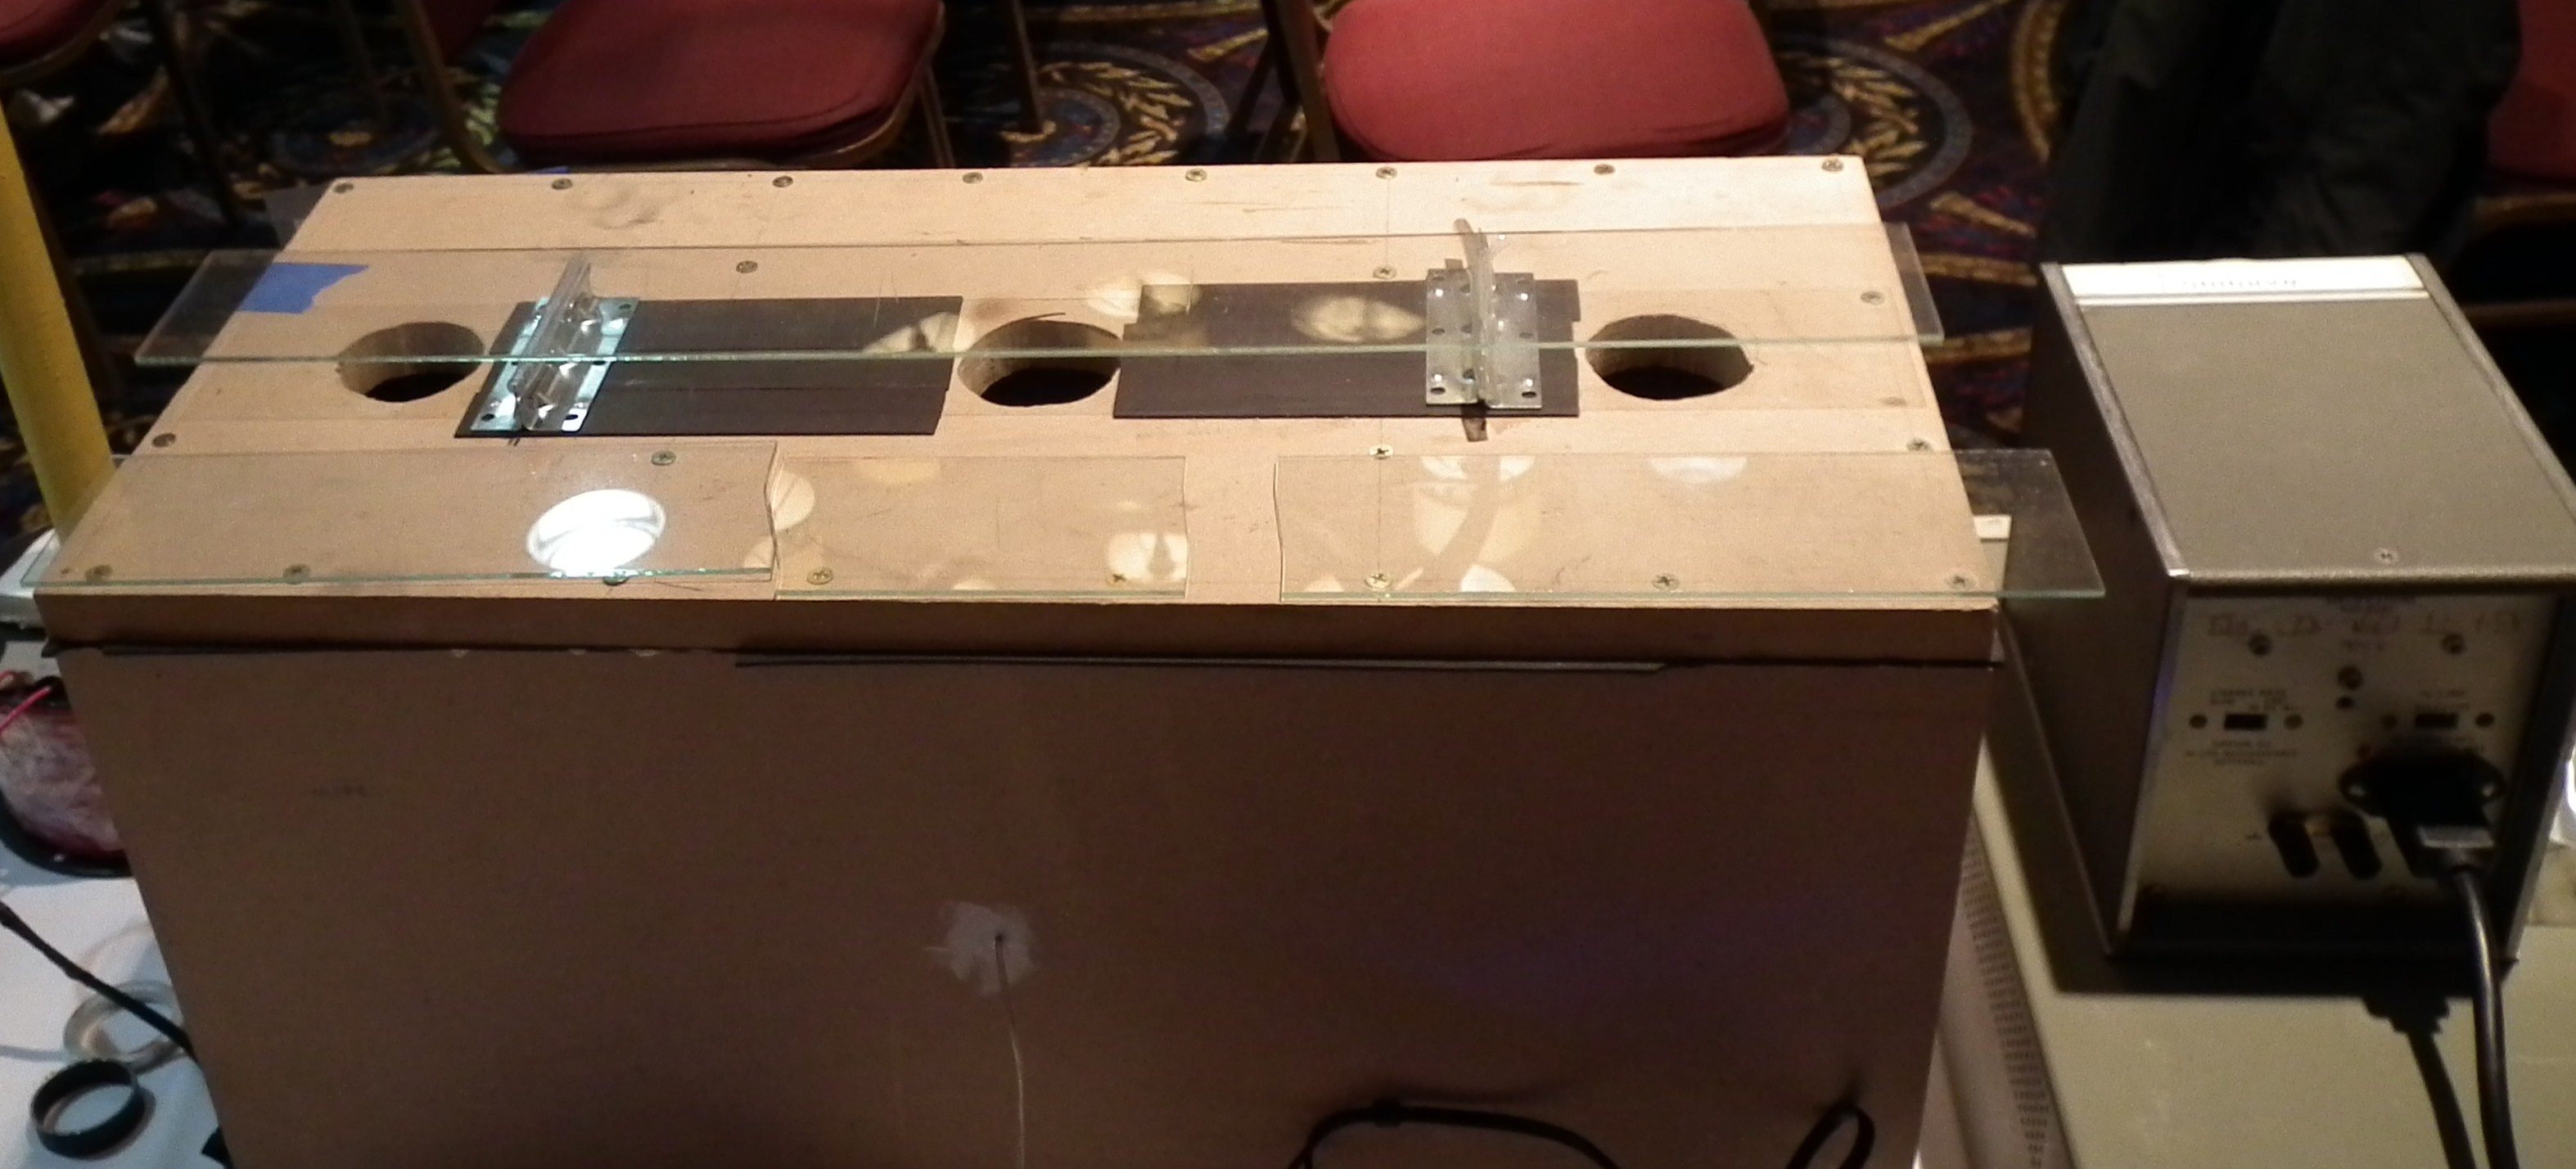
Making the Cannon

First, I switched to transparent PVC. The stuff is expensive ($40+) and is not at your ordinary hardware store. Grainger sells it, though, and I picked up this 8 foot section at a local store in Arlington, VA. (I'm on sabbatical this year.) I also got a transparent connector. You can use opaque, but transparent is cool, especially for high speed cameras.

To connect to the vacuum pump, I drilled a hole 4 inches from one end using ???? which does a good job making a clean hole even in PVC. Using a pipe wrench I twisted in a short 3 inch long, 1 inch diameter brass pipe with tapered threaded ends. The pipe itself cut threads in the relatively soft PVC. This seals pretty well but not perfectly. After everything was done (and tested), I kneaded some plumbing epoxy and pressed it around the pipe to give the connection some stability and make a slightly better seal.

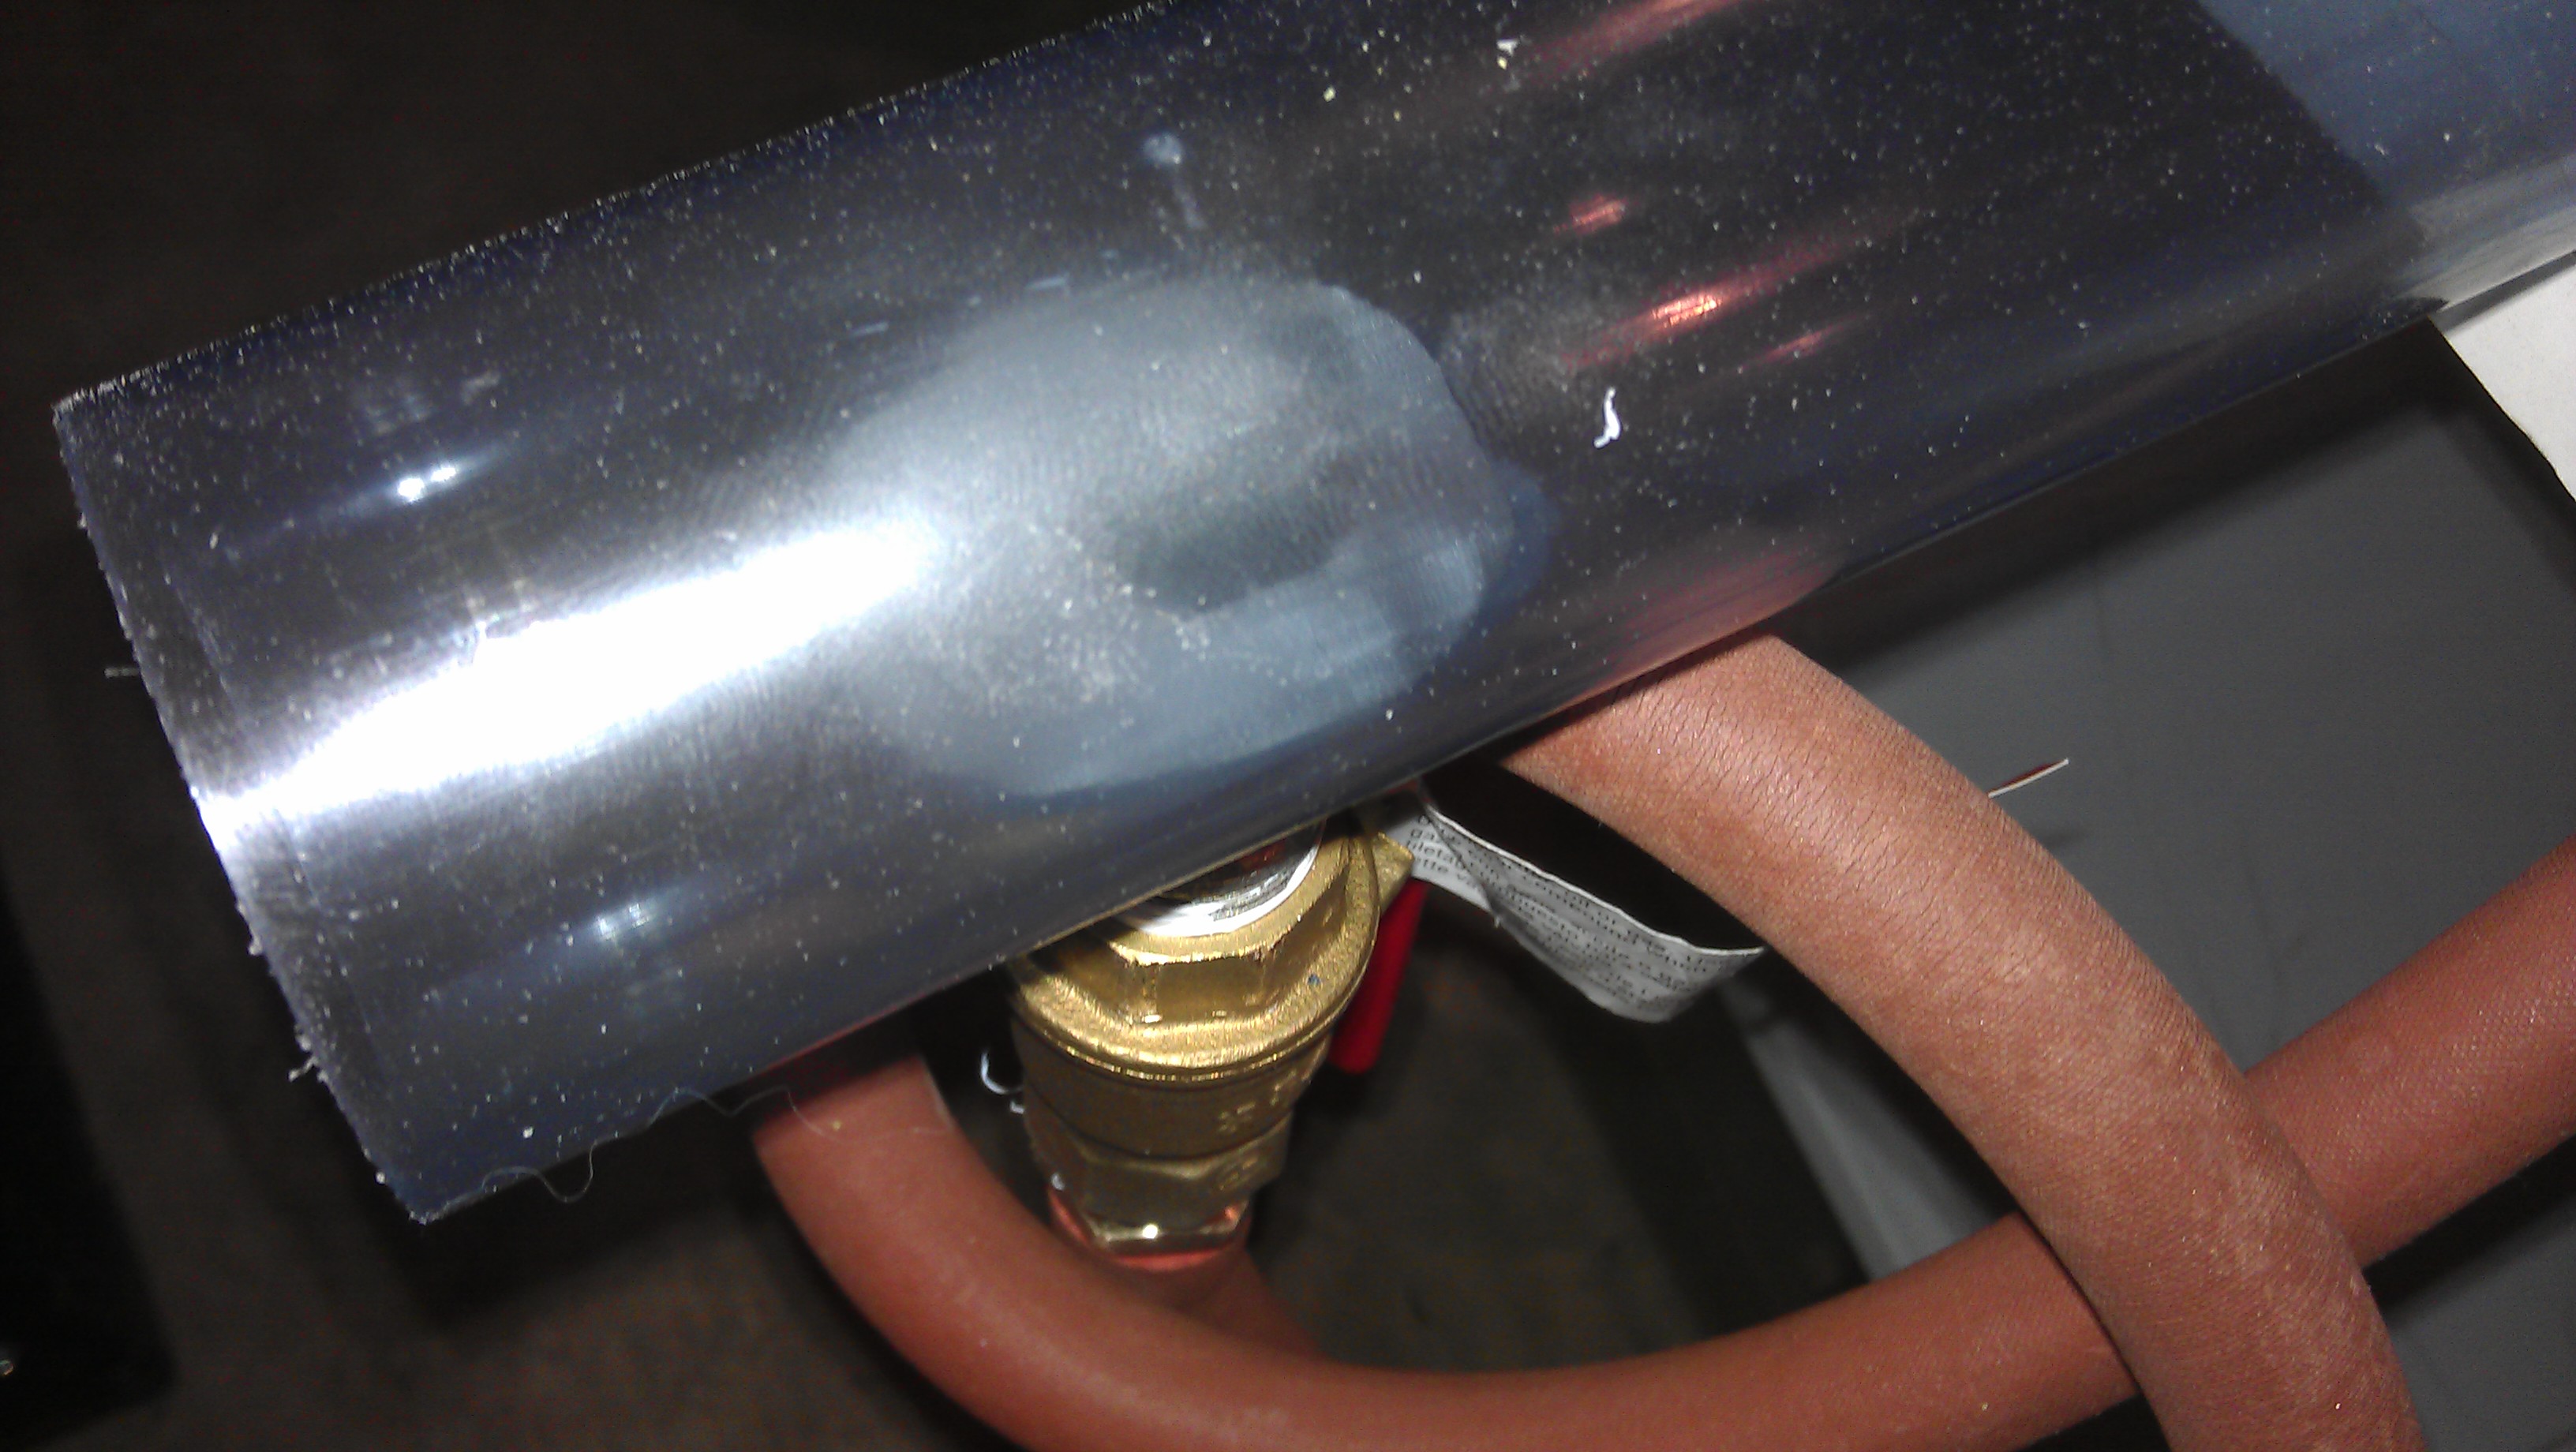
I screwed a 1" brass gas valve to the pipe using Teflon tape. I close the valve before firing to protect the pump from in-rushing air. I attached a brass nipple to the other side of the valve also with Teflon Tape.
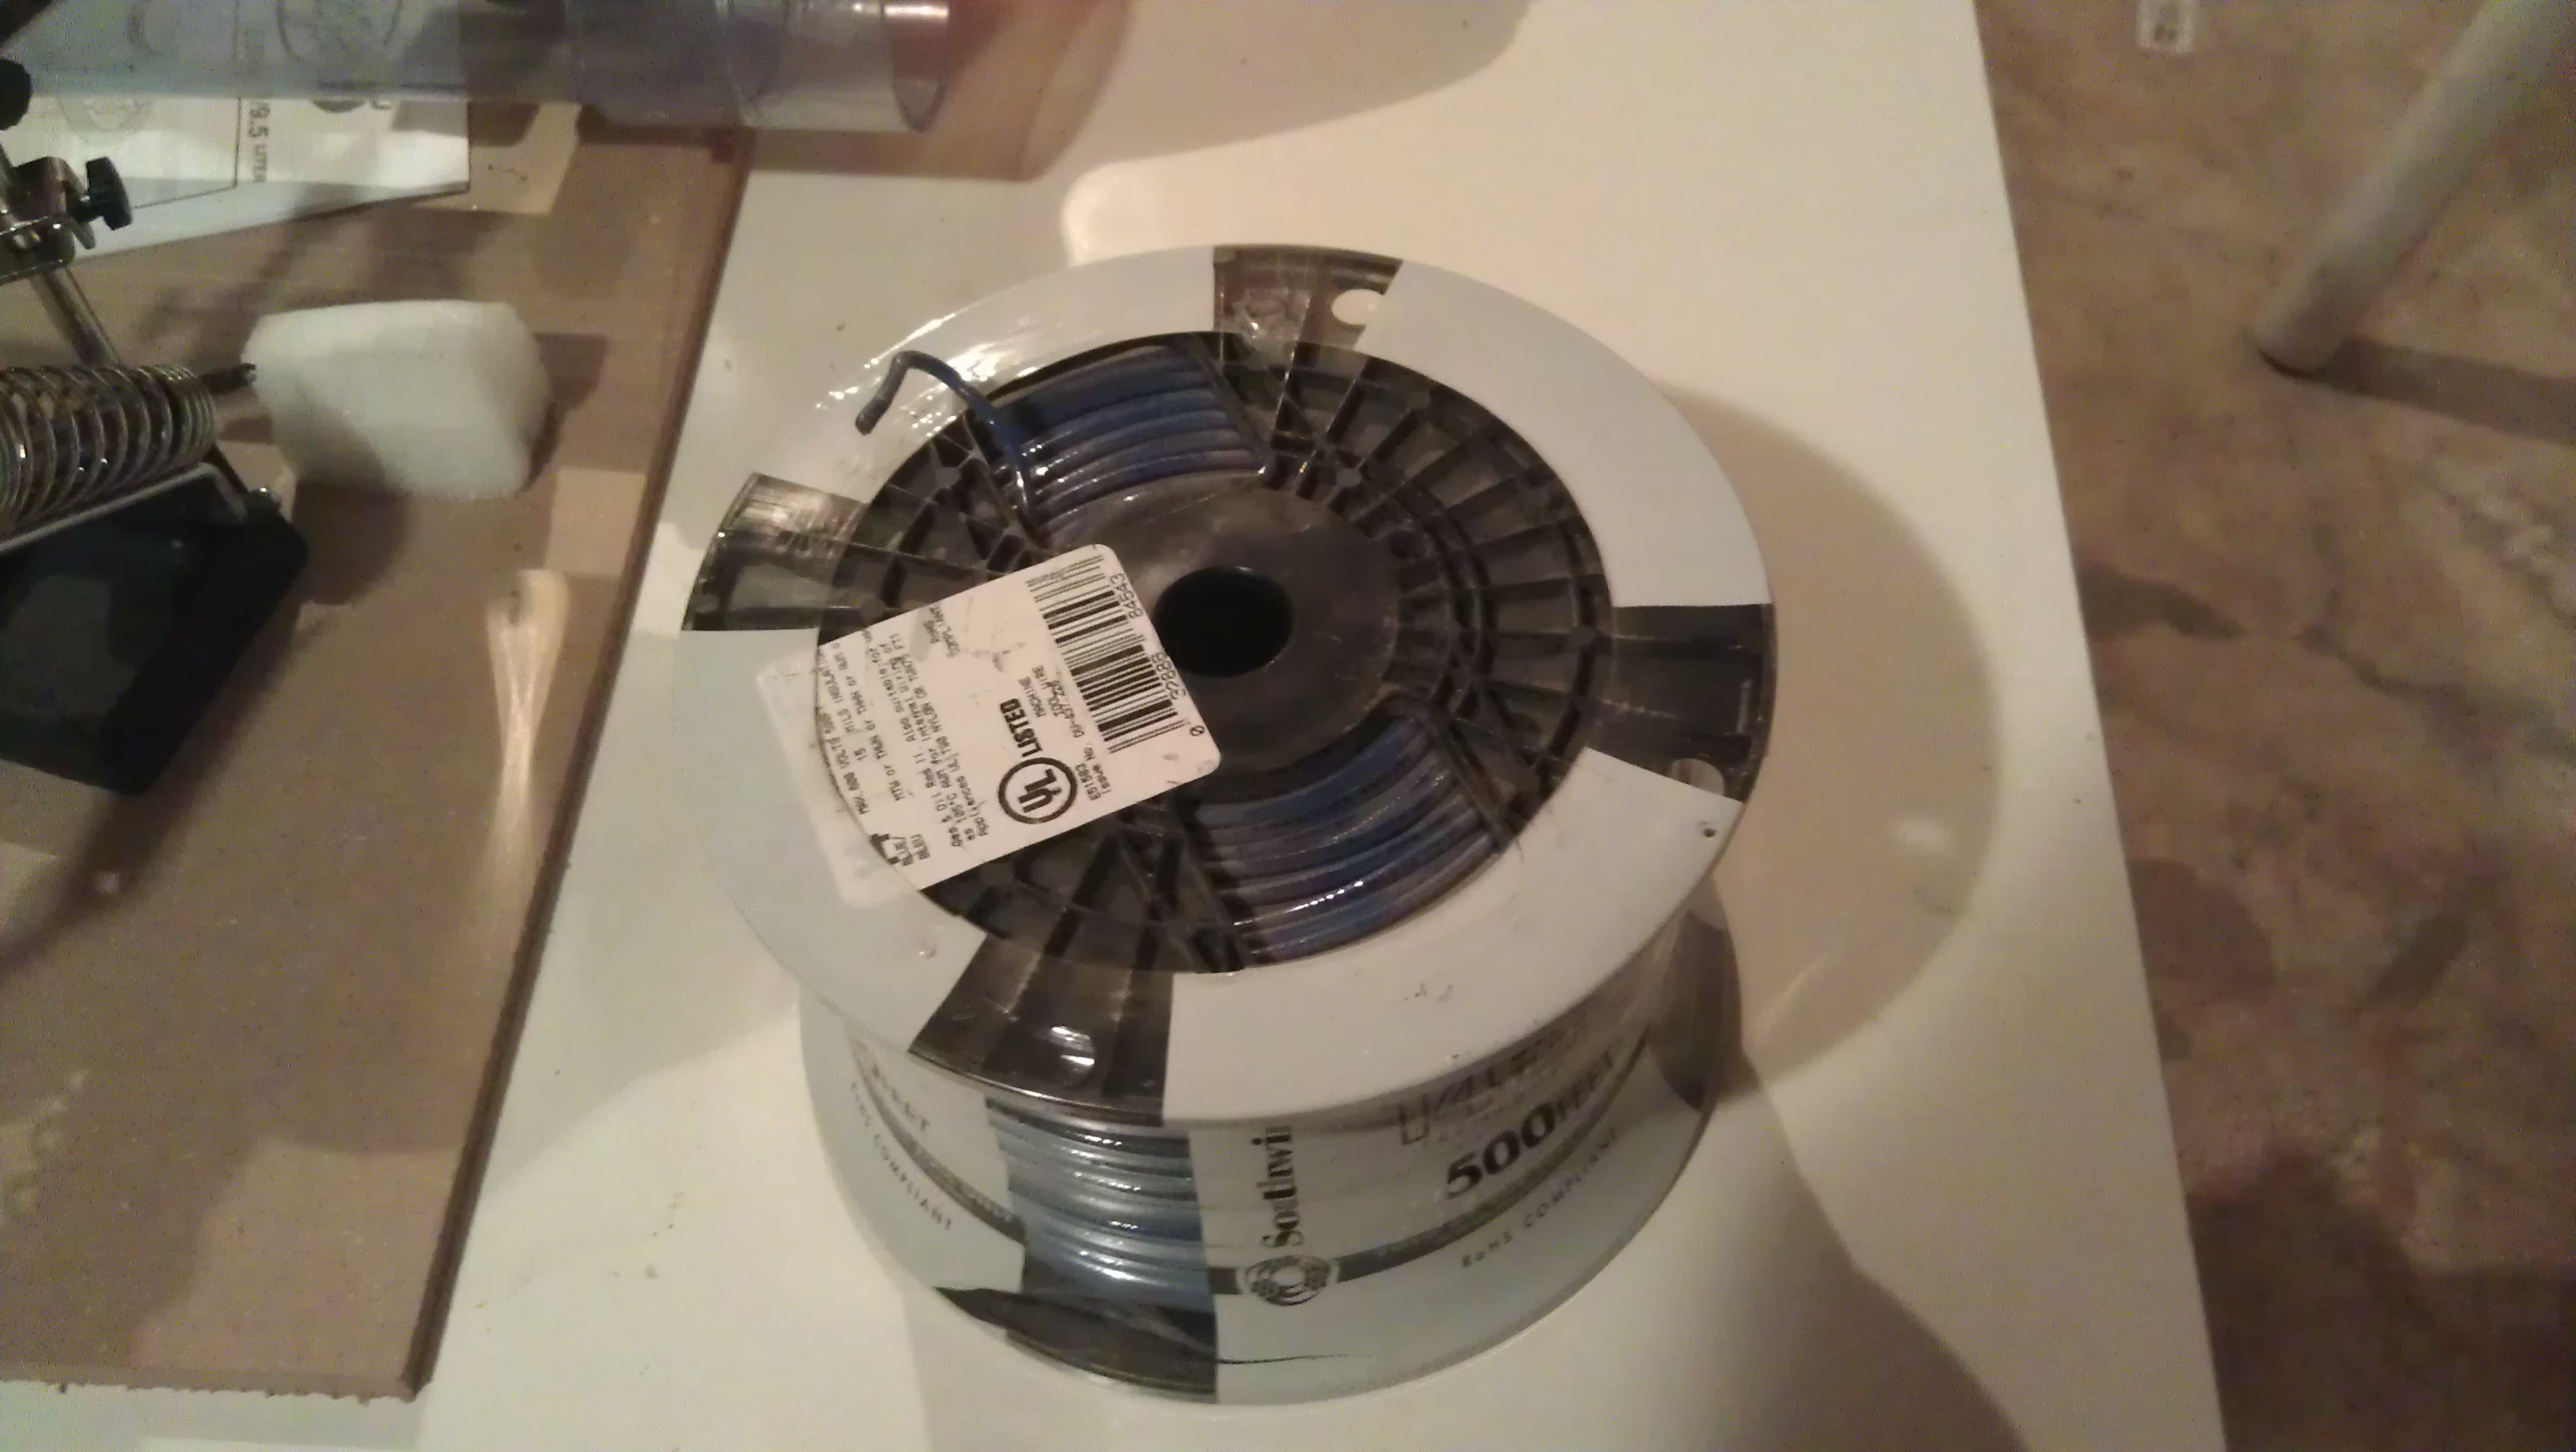
Tubing and Pump

The red hose is vacuum tubing. I had some given to me, but you can buy it here from Flinn Scientific.

This gets connected to a vacuum pump. I've been using scientific pump but didn't bring it with me from SF. I bought this small pump from Harbor Freight Tools for $150, and it has worked like a champ so far.

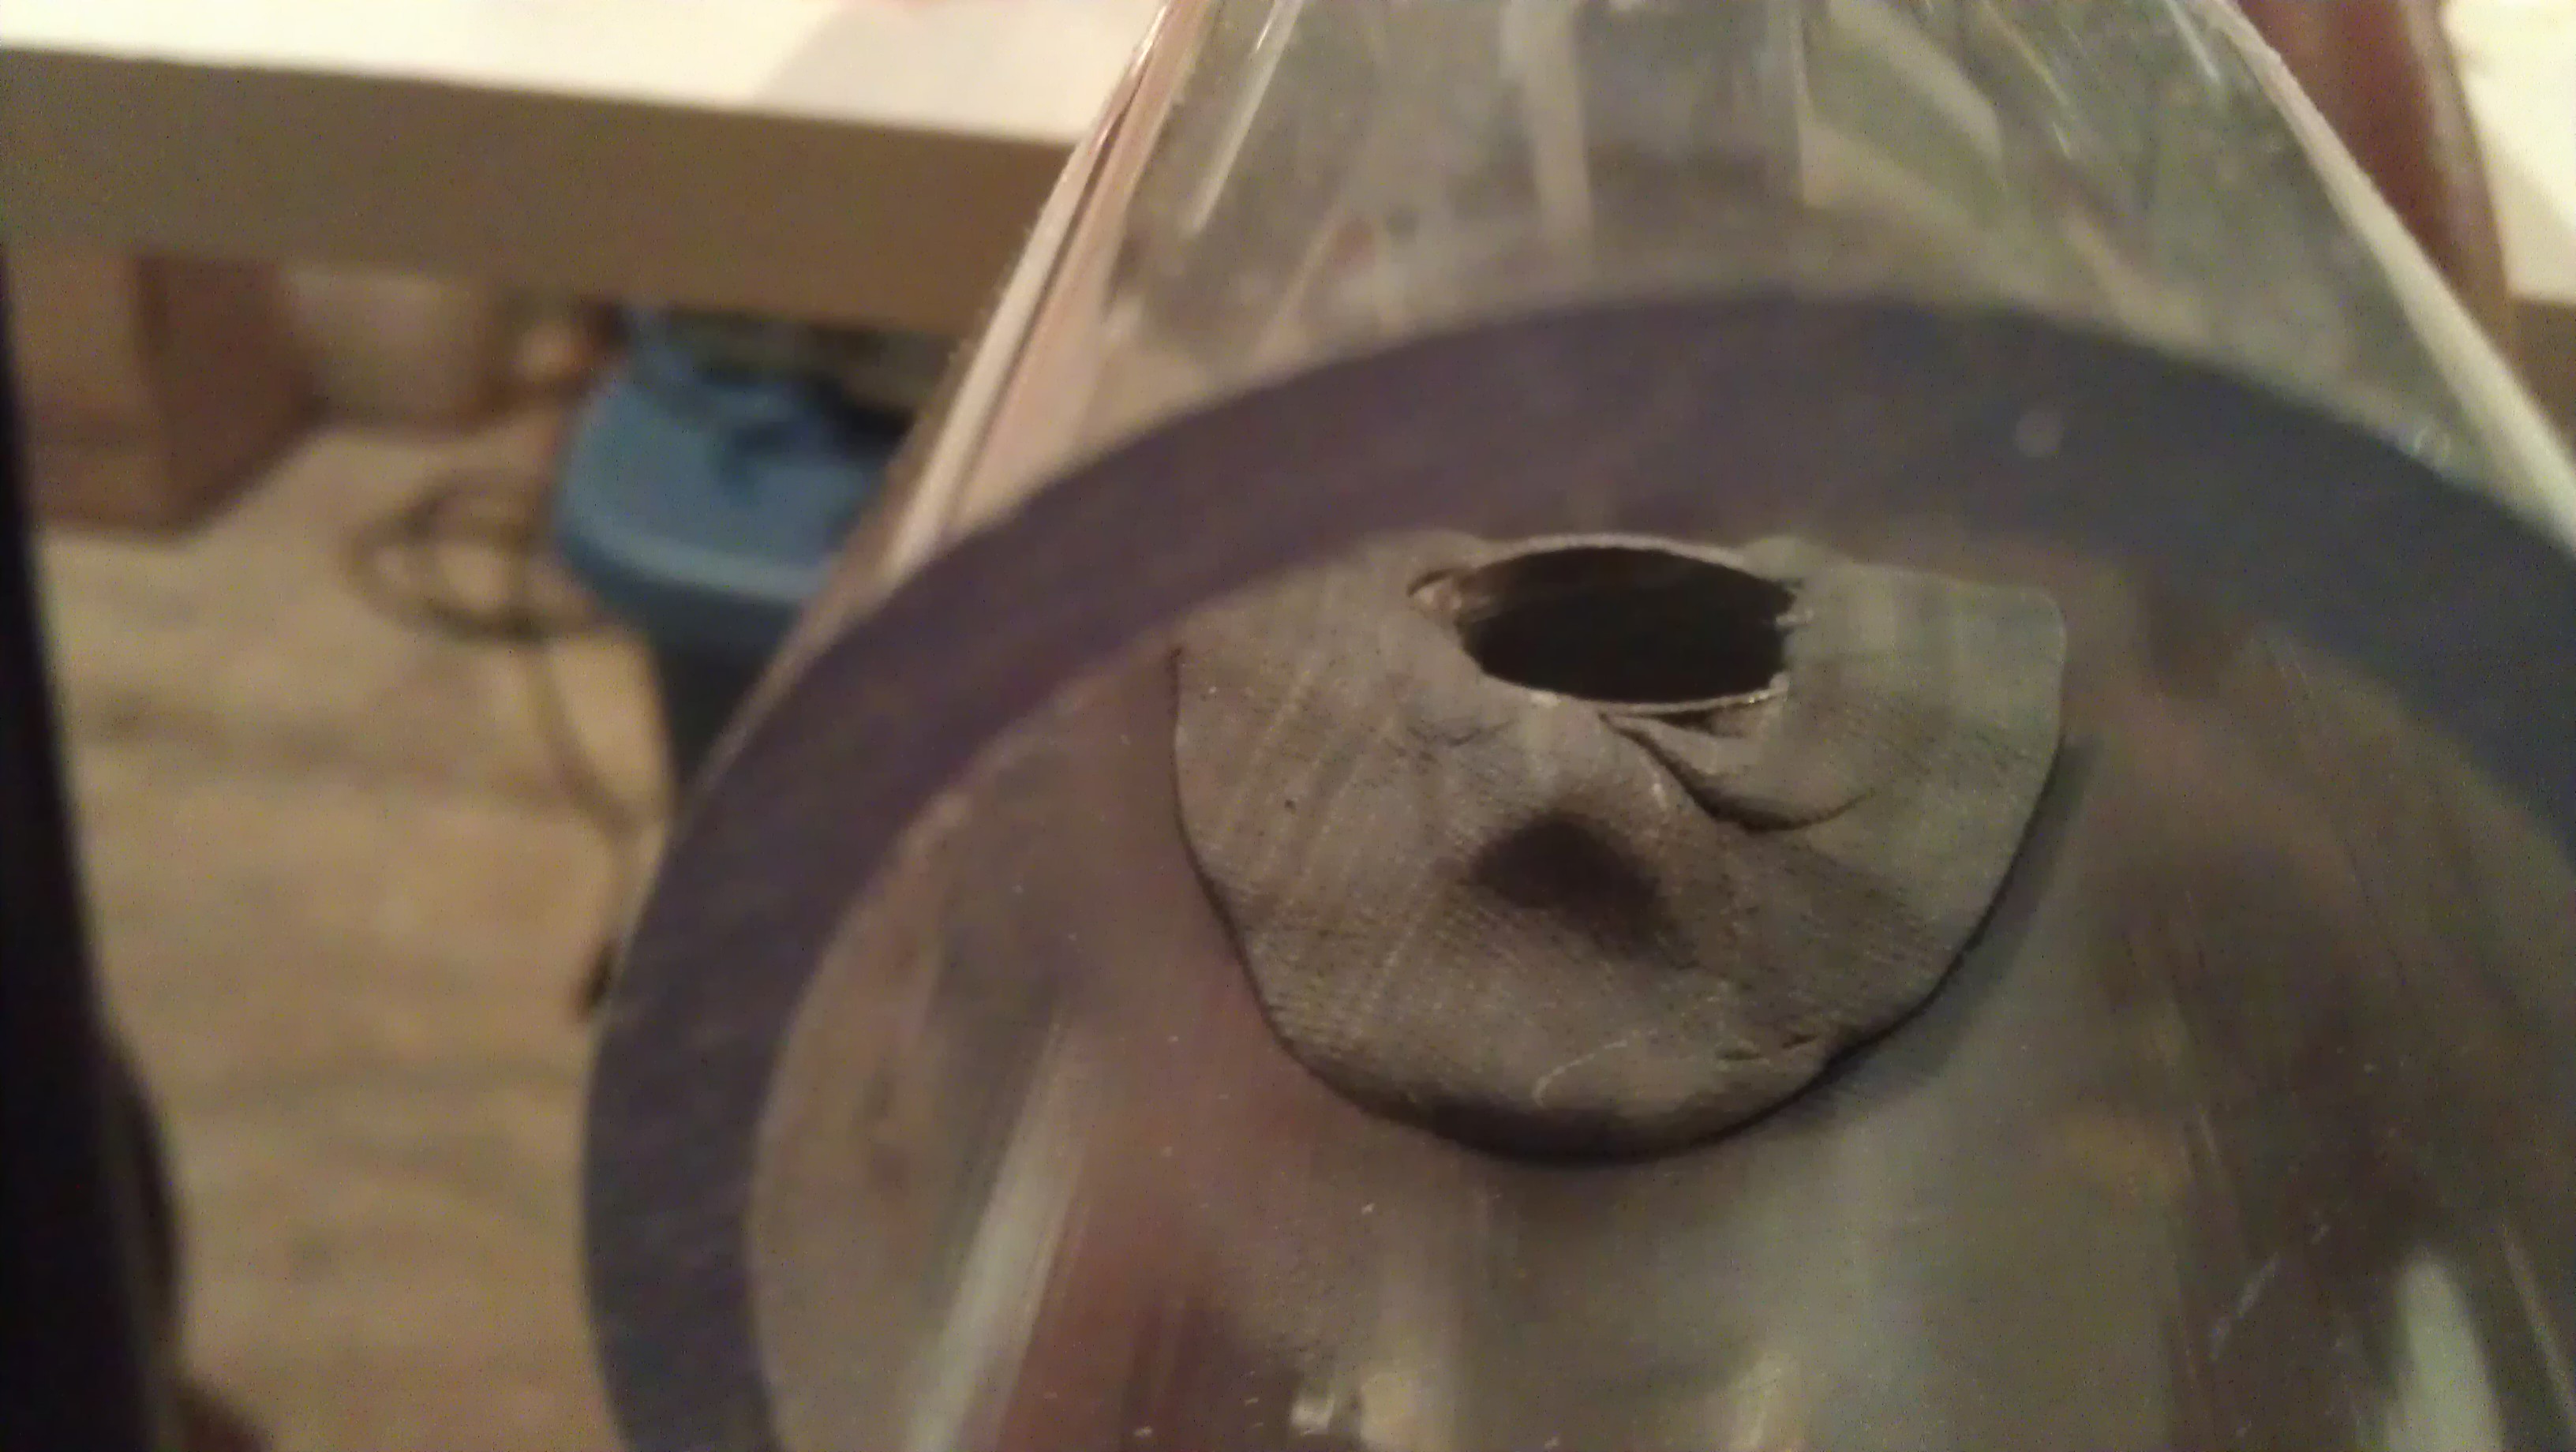
I use one star (cheap) standard 40 mm Ping Pong Balls and pieces of emergency blanket (mylar) to seal the ends. I got the idea from folks at BYU, but I see the link is dead. Sigh. What I do is cut a 10 cm x 10 cm square and pull it over the end so it fits smoothly. Here's a picture.

Then I push a PVC connector over to seal. Love this method. It seals better than tape, is much faster to apply, rarely gets sucked into the pipe, and when it does, it doesn't get stuck. 

Can Holder


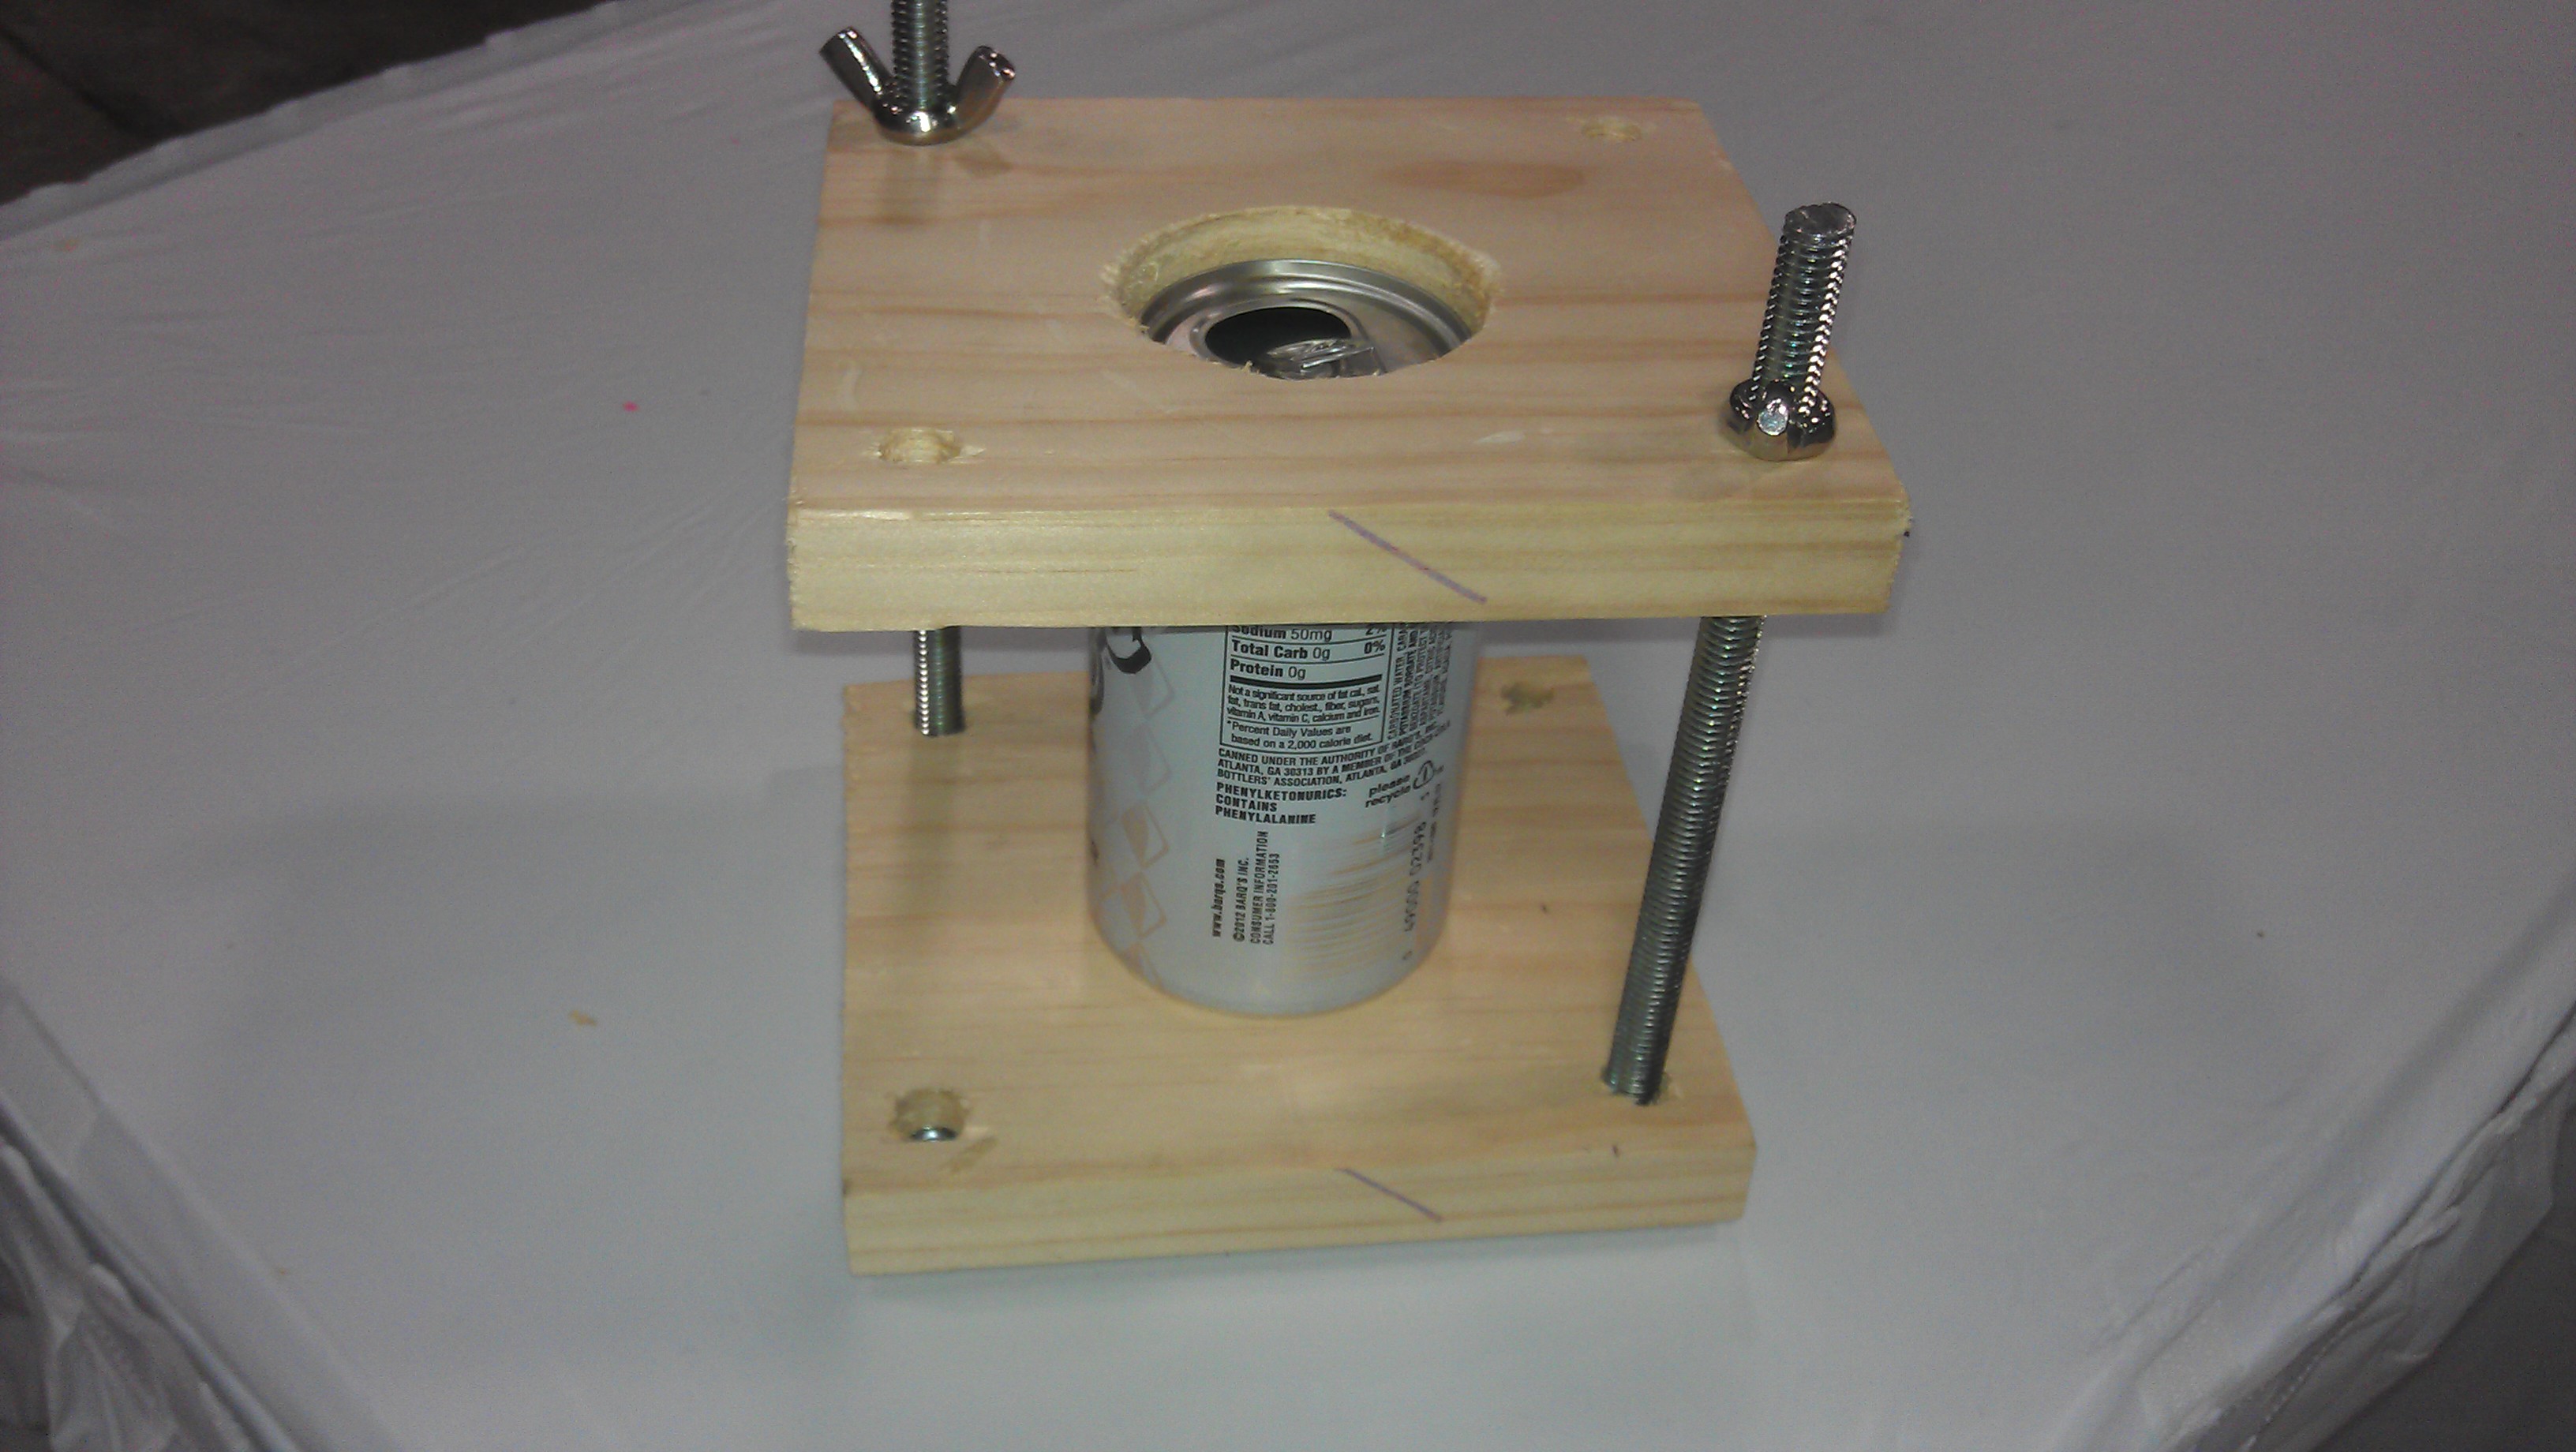
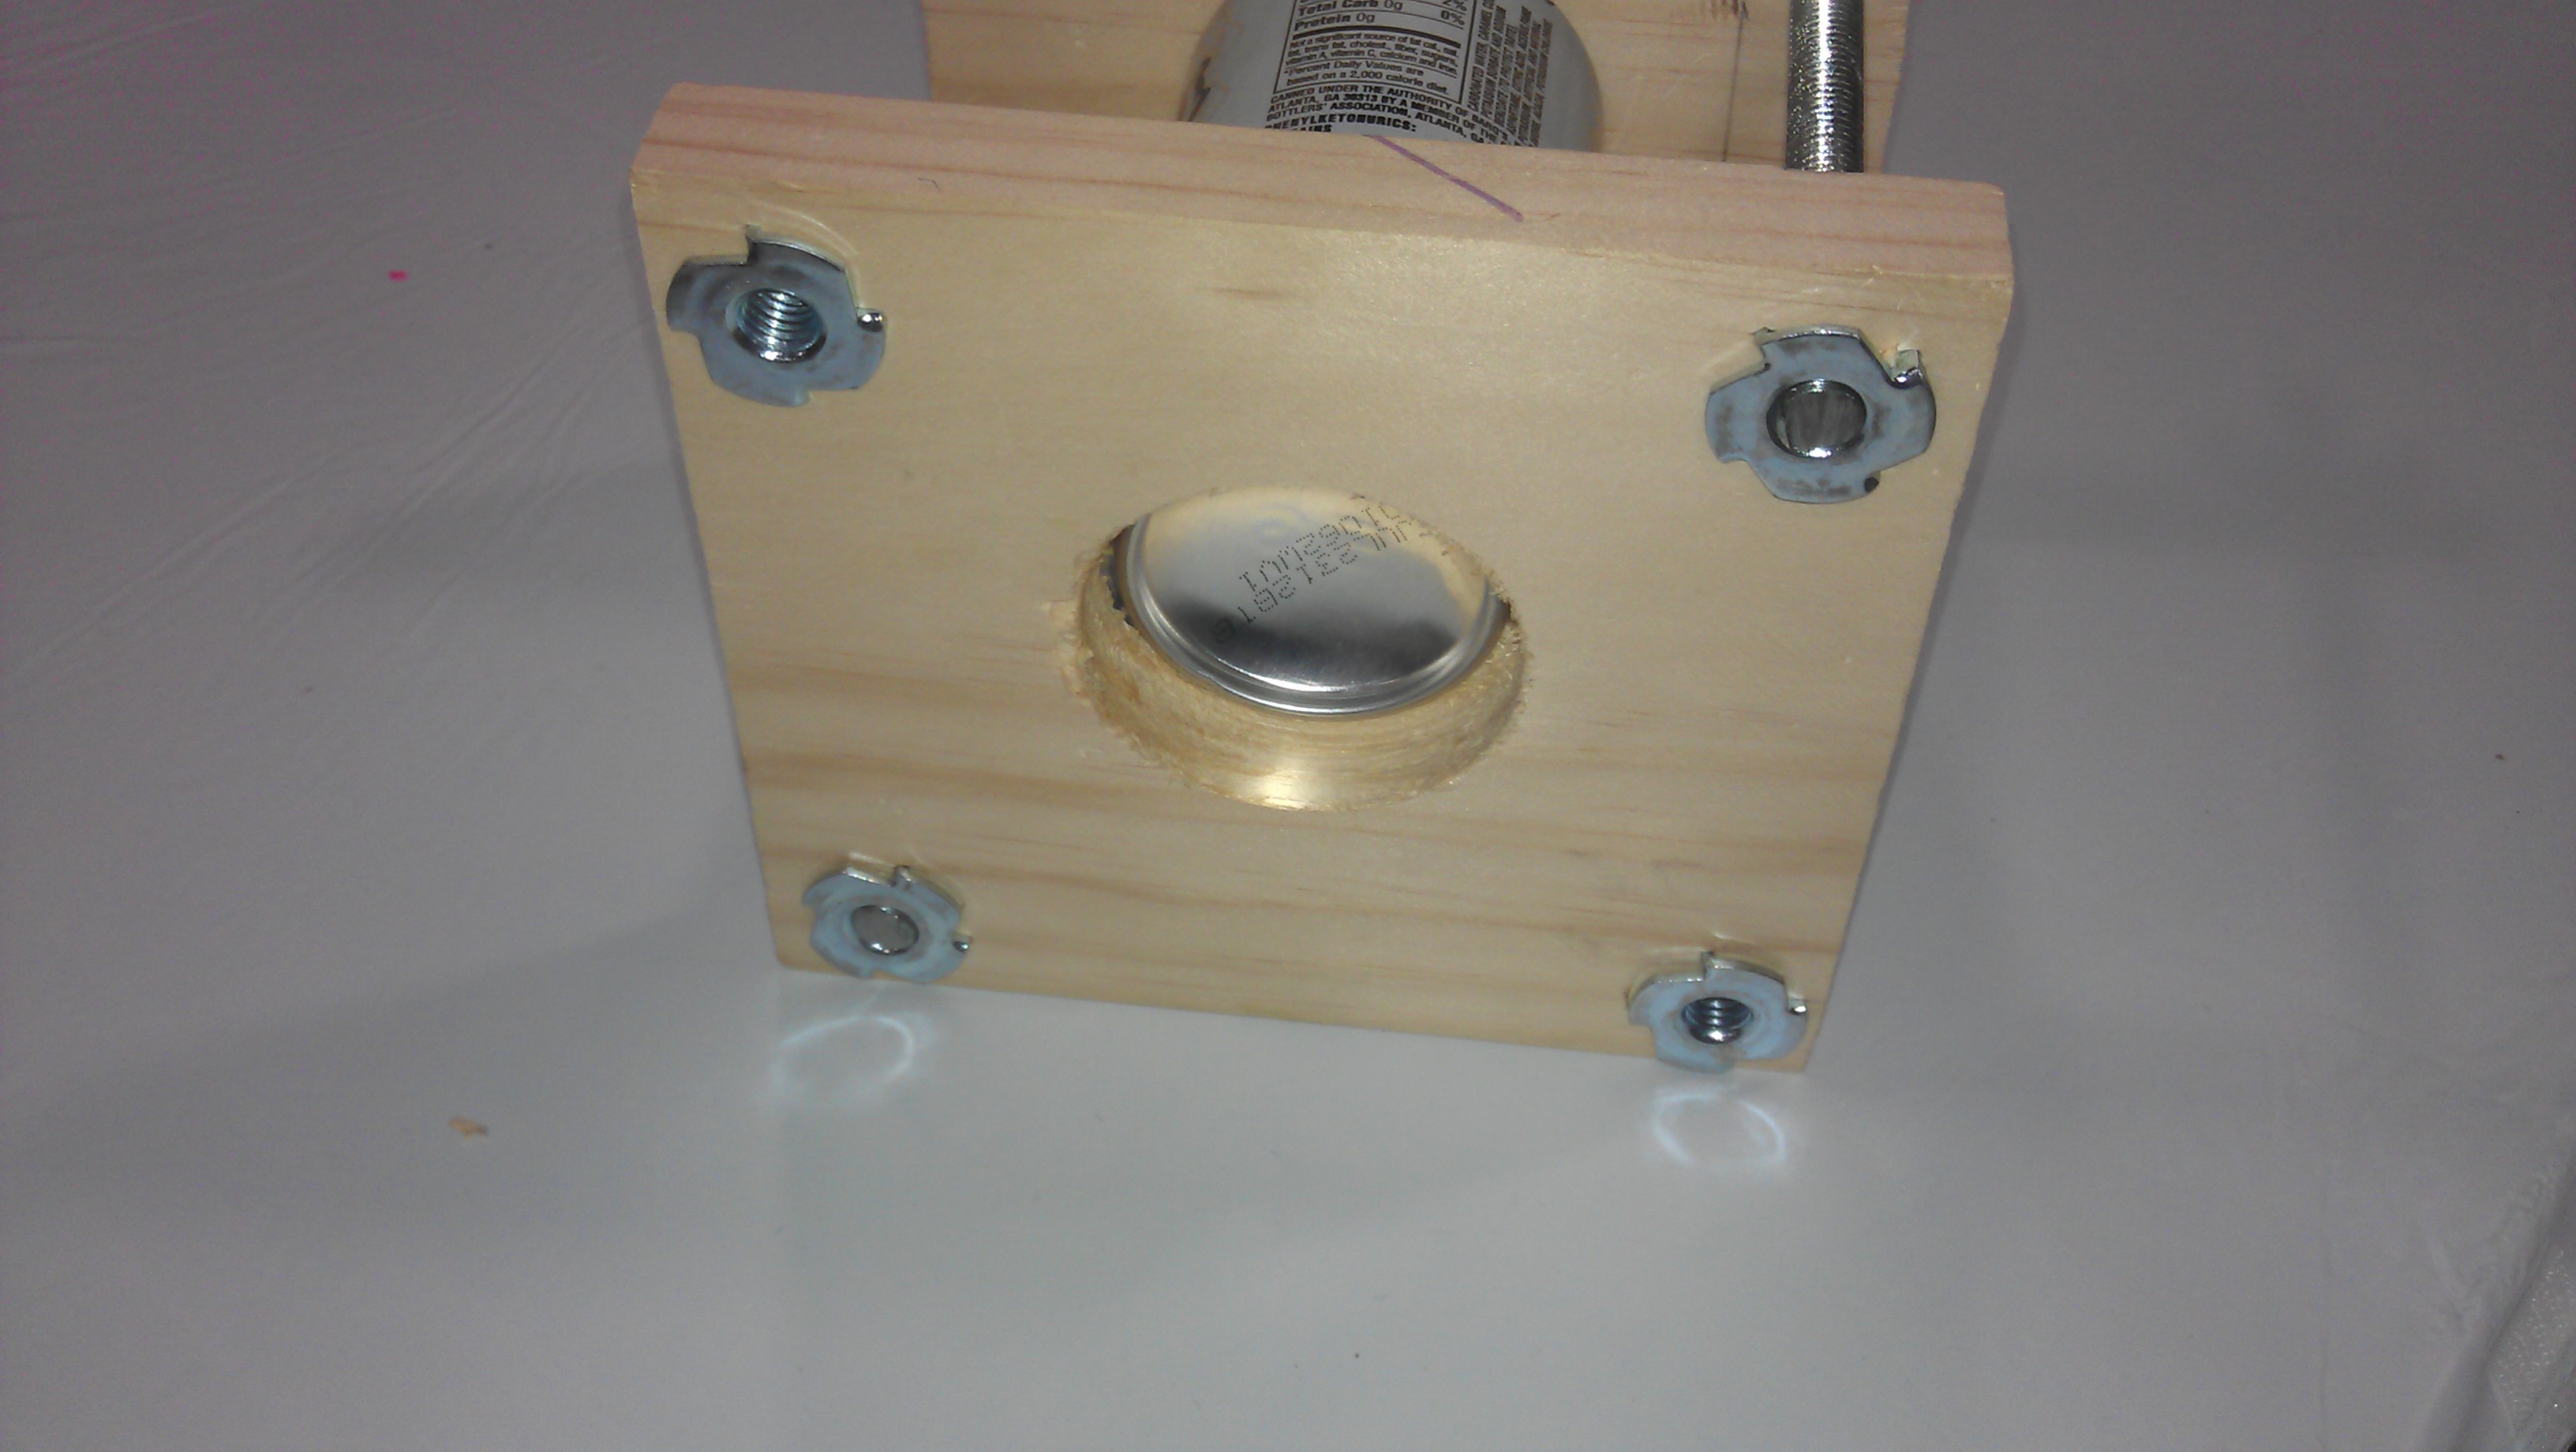
I used to use a bar clamp to secure a can to a lab jack, but I've upgraded and now have cut a holder.

The holder uses the fact that aluminum cans have a slanted top and bottom (a frustum) so that the can can be wedged and held in place.

To make the holder,


  1. Cut two squares of wood approximately 6 inches to a side and 3/4 inch thick. 
  2. Cut a two inch hole in the center of each square using a hole saw. 
  3. Stack the two boards together so that the holes line up as close to perfectly as possible. Clamp together.
  4. Drill two 1/2 inch holes through both boards on opposite corners. I drilled four holes, but I've since discovered that two work just fine and makes it easier to clamp. 
  5. Cut using a hacksaw two pieces of 3/8 inch threaded rod about 7 inches long. 
  6. Unclamp the boards. Insert and pound in two 3/8 inch t-nuts in the orientation in the picture. 
  7. Place the can so that the frustums slip into the slots. Tighten with two 3/8 inch wingnuts. 


The fired ball has a lot of energy but not much momentum, so it isn't probably going to knock the holder over or move it far, but metal and pieces of ball can fly after the collision. I put up an explosion shield. It's overkill, though. 

Some people make a holder that holds three cans. The ball tends to pass through the first two cans and get caught by the third. That works well, but I think that it's less dramatic than seeing a single obliterated can. 

Wednesday
Apr252012

Walking Barefoot on Broken Glass Update

I'm in DC as an Albert Einstein Distinguished Educator Fellow at the National Science Foundation. I was invited to do one of my physics shows at USA Science and Engineering Festival as well as TJStar. Some of my materials, I brought with me. Some I had shipped. I didn't ship 100 pounds of broken glass. So how will I walk on broken glass? My friends at the Foundation and in the Fellowship have been bringing me wine bottles and I have been breaking them into bits.

My SF bed of broken glass is made of window glass that I got from Urban Ore. Broken window glass is sharp but flat. Wine bottle glass is less sharp but curvier and doesn't lie as flat. It also seems to make more little shards. So far so good, but I'm watching out.

Video of me walking barefoot on broken window glass.


Tuesday
Apr242012

USA Science and Engineering Festival

My first show outside the Bay Area. I'll be at the USASEF all weekend. I have a 50-minute show on the Carver Stage at 2:00 pm on Saturday and a 20 minute show on the Einstein Stage at 11:30 am on Sunday. See you there

Sunday
Apr152012

Optical Siren

For the last several years Ranjit Bhatnagar has made a different musical instrument each day in February. His Optical Siren from 2012's batch caught me attention.

Inspired by Ranjit's siren, I decided to make a larger one for my show. It ended up being fairly straight forward.

The thing in the back is a cordless drill. I cut a circle, using aviation snips, out of a piece of perforated aluminum plate that I bought from Online Metals -- Aluminum 3003-H14 Perforated Sheet Round Hole 0.063" Thick (0.125" dia. holes) 0.1875" stagger. The edges were a bit ragged, even after sanding, so I covered the edges in a couple of layers of duct tape to cushion.

I had to drill out the center a little to put in a screw.

The detector is a optical diode from DigiKey. I got mine from Radio Shack but they don't sell them anymore. I connected it in series to 1/8 inch mini plug (headphone plug) and a 9 V battery. I plugged headphone plug into a small Radio Shack amplifier. You can see this construction as it is similar to the set up for the Communicating with Light arrangement from the Exploratorium.  Remember the photodiode is a diode, and so it will work much better one way than the other. You may have to swap it.  

If you have a fluorescent light in the room, you will hear a buzzing right away. The photodiode works as a switch. The more light that hits it, the lower the resistance, letting more current flow from the battery. Fluorescent lights blink on and off hundreds of times a second, so the amplifier is getting hundreds of pulses of electricity a second. These pulses cause the speaker cone to move out and in, making a compression and an expansion in the air. In a chain reaction or domino way, these compressions and expansions move through the air until they get to your ear where it interprets them as sound.

More compressions per secnod are higher pitches and fewer compressions are lower pitches. Bigger compressiosn or expansions are louder sounds.

The photodiode is so sensitive that even the fluctuation in the intensity of an incandescent light bulb will make a tone.

The main idea though is to create the flashes of light using the spinning disk. Start the drill and place the diode near the spinning disk. When the photodiode is near the center, the pitch is lower. When it is near the edge, it is higher. Why?

Tuesday
Mar202012

Lasers Popping Balloons

This is a video that I made with the team at the National Science Foundation.

Has something to say about color theory as well.

Wednesday
Nov022011

Upcoming Shows!

I have three upcoming shows as part of the Bay Area Science Festival. Friday is a small intimate show at the Atlas Cafe from 6-7 http://www.bayareascience.org/11/04/science-pub-crawl/. On Sunday (tentatively at 2 pm), I'll be at AT&T Park for Discovery Days http://www.bayareascience.org/11/06/dd-at-att-park/ but first, I'll be at Mad Scientist Nightlife at the California Academy http://www.bayareascience.org/11/03/mad-science-nightlife/.

Tuesday
May312011

Magnetic Clamp

A few companies sell a magnetic clamp for creating strong magnetic fields. Although the clamps are sturdy and versitile, they are expensive. Often very expensive. I decided to make my own.

I used a Jorgensen wood clamp. The clamps are very strong, and the threaded screw rods allow for very precise adjustment. The magnets are from K&J Magnetics and are 1" x 2" x 0.5" N42 rare earth magnet with (and this is the good thing) counter sunk screws holes. Excellent. Mine took a #10 screw and I used non-magnetic stainless steel, though magnetic steel would have probably been okay. (They are out of stock on this particular magnet, but they expect more and others would work.) 

The key is to drill holes in the wooden handle first, then drive in the screws. 

The idea was to make a pendulum that would show eddy currents. The bar is made of aluminum an 1/8 inch thick and the plates are made from 6 x 12 x 1/8 inch aluminum as well. I cut the slots on a miter saw but I don't recommend that as it was very dangerous, although it works with a carbide blade. I tried a bunch of ways of attaching the plate to the blade, but opted for the clamp which can be changed out the quickest. All the metal was obtained from Online Metals. They cut to order and for cheap.

Monday
May022011

Resonance Glass Breaker

Breaks glass with sound. If you look carefully you can see a broken piece of glass.I built a copy of David Kardelis's glass breaker. <http://www.personal.psu.edu/ref7/apparatus/2006%20competition/kardelis.htm> It breaks pieces of window glass rather than wine glasses. It has some cool advantages over the traditional wine glass breaking with sound. 


  • The neatest thing is that it debunks the idea that only crystal wine glasses can be shattered with sound. 
  • You can see from a distance that the glass is moving and the mode of vibration is really obvious.
  • The breaking frequency is about 34 Hz, nearly outside the range of human hearing. Much more comfortable. 

The glass breaker has three holes. Two supports are added and a strip of window glass is placed on top them.  Sound waves come out of the holes, with the two outside holes being totally out of phase with the center hole. The sound is generated by two speakers that face each other inside of the box.

The inside of David Kardelis's box. I forgot to take a picture before I sealed mine up.

I broke 3 inch by 24 inch strips of window glass at 33.5 Hz.

I've made a few changes to make glass breaking more reliable. 

First, used window is full of micro-fine cracks almost invisible in the glass. These make the glass easy to break. New window glass is much, much harder to break and when it breaks it makes many small pieces. So, when I use new glass, I score it with a glass cutter around the center to help control the breaking.

Second, I bought a good subwoofer amplifier that cost about $100. Mine is a 12 V car amplifier that I run with a computer power supply. You could buy a plate amplifier too. The advantage over a normal receiver is that the output current and voltage have much lower distortion. Subwoofer amps also dissipate heat better. I have burned out a receiver running it for a long time. 

Third, after some excellent advice from fellow physics demonstrators on the mailing list TAP-L, I bought an HP 204C frequency generator. It makes beautiful sine waves. Other frequency generators, especially digital ones, often produce sine waves with jaggeties that seem to interfere with motion. Many of the them make obvious high frequency sound. A picture from HP MemoryI bought mine on Ebay for a good price of about $50. 

With these changes, it breaks glass more reliably than my wine glass breaker without blowing my eardrums out. 

Thursday
Apr282011

Optical Illusion

Optical illusions sometimes seem like artifacts of the graphics and drawing, but sometimes normal objects can seem strange. Look at the bicycle gears and hub below.

(Click to enlarge.) Weirdly, they don't look like they both will fit on the same hub. To my eyes, the center hole of the left gear set looks smaller than the center hole of the right gear.

They are of course the same size.


And they both fit on the hub.

This is a physical example of a classic optical illusion where the size of the outside affects your opinion of the inside. The Exploratorium has a good Adobe Shockwave implementation of this effect. <http://www.exploratorium.edu/exhibits/changingill/> The third illusion is pretty much the same as this one.

What suprised me was that the illusion was just as strong in person with real objects as with a graphic on a screen.

Friday
Feb112011

Weird Shadows

My school has window with our school name on it in vinyl letters.

In the morning on a sunny day, they cast a shadow on the wall.

The picture is actually in focus, but the shadow is blurry. Notice something interesting about the shadow. The places where there are holes, like the center of the "o" in community or the "B" in bay are actually darker than the shadows of the letters. Weird.

If you put a piece of posterboard closer to the glass, the centers are brighter like you'd expect. 

As the board gets farther from the window the holes close up and then get darker.


Friday
Nov122010

Seeing Where the Microwaves Are

Microwaves are invisible, so you can't see them inside microwave oven, but their presence can be detected with neon lamps. The changing electromagnetic field from the microwaves will make charged particles move, and so the electrons in the metal legs will move creating current. This current makes the lamps glow. I drilled a grid in a piece of 1/4 inch acrylic and slipped the lamps in. I bought the lamps here, but Tom Senior found a better price here. As the platter turns, the lamps light up showing where the microwaves are the strongest.

My grid is based on another group's work.

Wednesday
Nov102010

Vortex Launcher

Steve Spangler Science http://www.stevespanglerscience.com/experiment/00000076 gives a pretty good description on how to make a Vortex Launcher.

Just after Halloween is the time to buy a fog machine. They get very hard to find by spring and you will need to pay a fair bit more to buy one.

Smaller vortex launchers like the Zero Launcher are pretty cool too. http://www.amazon.com/Zero-Toys-Launcher-BLUE/dp/B000FK5JR4

Wednesday
Nov102010

Cracking off Bottles Into Cups

I've had pretty good luck making glass cups out of bottles through this method. While the break is rarely perfectly straight, it is usually good enough to make a glass out of it. 

The comments from the Corning Glass Museum point out that a fine flame works better, and I've used both kinds of torches. The fine flame does seem a bit better, but a plumbers torch works too.

If the bottle has lots of bumps in it and looks irregular, it will probably cut weirdly.

Make your scribe mark straight. The crack seems to follow its directions, so if you scribe at an angle, cut will be at an angle.

I haven't used Dan Rojas's technique since I haven't bought the equipment. His solar oven materials are excellent, so maybe this is a better method too.

Wednesday
Nov102010

Cup Speaker

There are lots of designs of this, especially ones that use paper plates and suspensions. They all seem much more complicated and finicky for barely any more sound. This http://www.exo.net/~pauld/activities/magnetism/speaker.html from Paul Doherty of the Exploratorium seems to work the best, especially for the novice.

Wednesday
Nov102010

Melting Glass in Your Microwave


My hero Bill Beatty shows how to do this on Vimeo. http://www.metacafe.com/watch/1004040/melt_a_frickn_beer_bottle/ The process is relatively straightforward. Remove the glass plate and rotator from your microwave. Place an empty label-less bottle toward the back of a microwave. Warm the side facing you with a propane or MAPP gas torch, then hone in on an individual spot until it glows red. Close the door and start the microwave.


Friday
Jun192009

Mini-Marshmallow PVC Blowgun

Friday
Jun192009

Hovercraft Video